
Tailgating is a pre-game tradition and an experience. It’s a chance to create memories and show off your team spirit in style, from the delicious food to the camaraderie with friends and fellow fans. One of the best ways to increase your tailgating game is by customizing your gear. If it’s creating personalized T-shirts, designing bold flags, or hanging eye-catching banners, your tailgating setup becomes a canvas for creativity.
This guide will take you through the steps of customizing your tailgating gear, offering tips on DIY T-shirts, flags, and banners that’ll help you stand out at the parking lot or backyard party. Let’s dive in!
Why Customize Your Tailgating Gear?
Customizing your tailgating gear showcases your team spirit and adds a personal touch to the atmosphere. It gives you the freedom to represent your team in a unique way and makes your tailgating spot easily recognizable. If you’re supporting your favorite college football team, NFL squad, or any other sport, personalized gear lets everyone know exactly where the party’s at.
Plus, customizing your gear can turn your tailgate into a vibrant and engaging space that brings fans together. So, how do you start? Let’s break it down!
1. DIY Custom T-Shirts: Show Off Your Team Pride
Nothing says “tailgate” like a custom T-shirt that’s unique to your squad. A DIY custom T-shirt is a fun and easy project, and there are plenty of creative ways to design a shirt that shows your team pride while ensuring you stand out from the crowd.
Materials You’ll Need:
- Blank T-shirts: Choose your favorite colors based on your team’s colors. You can find plain T-shirts in various materials, like cotton or blends, at most craft stores or online.
- Fabric Paints or Markers: If you want to add some color to your design, fabric paints or markers are great for vibrant designs and intricate details.
- Heat Press or Iron-On Transfers: These are essential for creating more complex designs or team logos.
- Stencils and Templates: These can help with precision if you’re going for a more detailed design like a logo, mascot, or slogan.
Steps to Make Your Custom T-Shirt:
- Choose a Design: Start by selecting a design. This could be as simple as a phrase like “Game Day” or a graphic of your team’s logo. You can find inspiration online or create something from scratch.
- Prep Your T-Shirt: Lay the T-shirt flat and smooth out any wrinkles. This will ensure your design goes on without any issues.
- Apply the Design: If you’re using stencils or hand-painting, carefully add the design to your T-shirt. For heat transfers, simply cut your design out and follow the instructions on the heat press or iron-on transfer sheets.
- Heat Set the Design: If you’re using fabric paint, let the shirt dry thoroughly, and then heat set it with an iron to ensure the design stays in place, even through multiple washes. If you use a transfer sheet, follow the pressing instructions to ensure the design is properly secured.
- Rock Your Shirt: Once you’ve finished, slip on your custom-made tee and show off your unique look at your next tailgate event.
Custom gear is essential for truly showing your team spirit; generic stadium shirts just won’t do. Custom gear, whether it’s a personalized flag for your spot or a run of unique shirts for your entire crew, is a tailgating must-have.
While screen printing can be expensive and messy, modern direct-to-film (DTF) transfers offer professional-quality, durable graphics that you can apply at home with a heat press. Importantly, DTF works well on common flag and banner materials, such as cotton and polyester, extending your customization options beyond just clothing.
To get the best value when printing multiple logos or small designs for shirts, koozies, or banners, you’ll want to order a DTF Transfers Now gang sheet, which allows you to maximize your space and print costs by combining all your different graphics onto a single, orderable sheet. This is the fastest, most economical way to supply your entire crew with custom, high-quality fan gear.
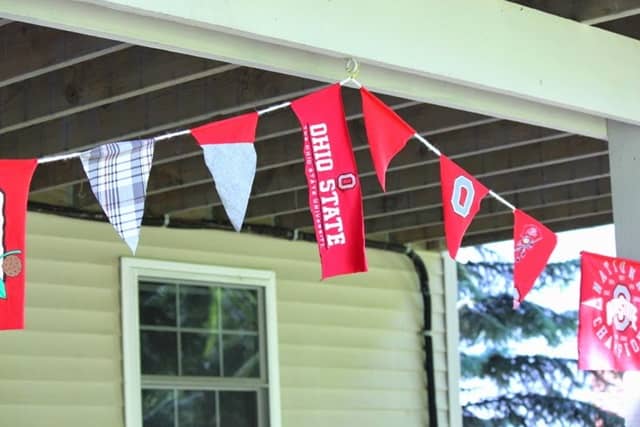
2. DIY Custom Flags: Make a Statement with Size and Color
A flag is an essential tailgating accessory that can be seen from a distance and immediately lets everyone know where your crew is hanging out. If you want to fly your team’s flag or create a custom design, DIY flags are easy to make and a fantastic way to make a statement.
Materials You’ll Need:
- Fabric or Flag Blankets: A large piece of fabric will serve as your flag. You can also use old sheets or a durable flag banner.
- Fabric Paints or Markers: Similar to T-shirts, fabric paints are ideal for creating bold and eye-catching designs.
- Sewing Supplies (Optional): If you want to add some trim or create a hem, you may need a sewing machine and fabric glue.
Steps to Make Your Custom Flag:
- Pick Your Design: If you’re going for something that showcases your team logo, a witty tailgate slogan, or just some bold colors, your flag design should be big, bold, and easily readable from a distance. You can draw inspiration from your favorite sports team’s mascot, motto, or colors.
- Cut the Fabric: Measure and cut your fabric to the desired flag size. Standard flag sizes range from 3×5 feet to 4×6 feet, but you can adjust according to the space available at your tailgating location.
- Add the Design: Lay your flag flat and use fabric paints or markers to add your design. If you’re creating a logo or text, ensure your lines are straight and the text is legible. You can use stencils or hand-draw the design for more intricate details.
- Finish the Edges (Optional): If you want your flag to have a more polished look, consider folding and sewing the edges to prevent fraying. This step is optional, but it can add a professional touch.
- Hang Your Flag: Once your flag is complete and dry, attach it to a pole or hang it up using rope or twine to display it proudly at your tailgate location.
3. DIY Custom Banners: Bold, Big, and Full of Personality
Banners are another great way to personalize your tailgate space. If you’re welcoming your friends or showcasing your team spirit, a custom banner gives you a large canvas to work with and can be placed anywhere, from the front of your vehicle to the sides of your tent.
Materials You’ll Need:
- Banner Fabric or Canvas: Look for large sheets of fabric or canvas at a craft store or fabric store. You can also repurpose old fabric or tablecloths.
- Paints or Markers: Fabric paint, acrylic paints, or permanent markers will work for creating your banner design.
- Rope or Twine (Optional): This can help you hang the banner from your tent or vehicle.
Steps to Make Your Custom Banner:
- Select a Design: Your banner should be big and bold. Think of simple slogans like “Tailgate Legends” or “Home Team Fans.” You could also include your team’s logo or mascot for added flair.
- Cut the Fabric to Size: Measure and cut your fabric to fit your tailgating area. A common banner size is 2×6 feet, but you can adjust based on your space.
- Create the Design: Use paint or markers to fill in your banner with bold, clear designs. For a more intricate design, you can use stencils or print a template onto the fabric before painting it.
- Add Hanging Loops (Optional): If you plan to hang your banner, add loops at the top corners and tie them with twine or rope for easy hanging.
- Display Your Banner: Once the paint is dry, hang the banner where everyone can see it and enjoy the personalized touch you’ve added to your tailgating experience.
Conclusion
Customizing your tailgating gear adds a fun and personal element to your tailgating experience. You can showcase your team pride, stand out from the crowd, and create lasting memories with friends and family by making your own gear. The possibilities are endless with DIY techniques and the right tools for transfer sheets. Grab your materials and get ready to make your next tailgate a standout event!