

Sure, when you first bring home that divine new gas grill, you’re oozing with loving care. Soot, grime, and grease dare not show their face before you’ve wiped them out. But that honeymoon period wanes — and so does your cleaning routine — as your grill becomes your old friend. But don’t go soft. Regular upkeep extends the time you have together and keeps residue and buildup from causing components to break down and rust. Not to mention keeping flavors true to the flame. Our friends at BBQGuys recommend these three gas grill maintenance steps to keep your grill in tip-top shape.
Burn, Baby, Burn
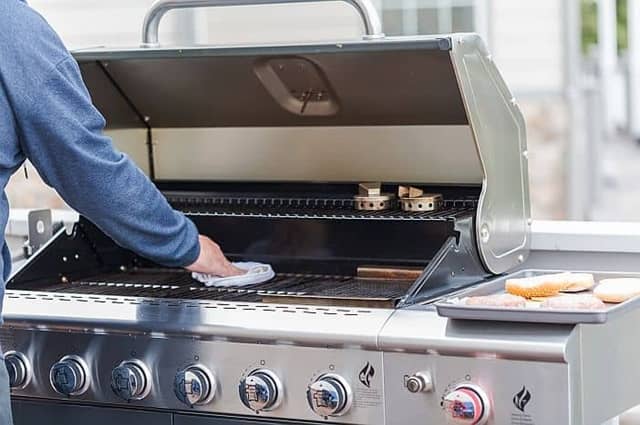
Would you rather wrestle with caramelized food stuck to your grill grates or simply brush aside ashy flakes in a matter of minutes? If you’re like us, you prefer quick and painless in everything, especially cleaning. Thus the magic of the “burn-off.” This process reduces food residue to white or gray flakes that practically fall off the grates.
Begin by closing the lid and turning all burners to the highest heat setting for about 10 to 15 minutes. When smoke stops flowing from the back of the grill, you’re done. Turn the burners off, disconnect the gas if necessary, and let the grill cool off to a moderate 250°–300°F.
Now get rough. Grab a grill brush or create a makeshift scrubber by loosely balling up a few feet of aluminum foil held with tongs. Then scrub back to front just once on every grate. After that, check for any spots that need more work. This should be an easy-going task if you allowed enough time for burn-off.
Now you have those beauties glimmering again, season them with a thin coat of high-smoke point oil (we prefer palm or grapeseed) to prevent food from sticking the next time you fire up your dear old friend.
Follow this routine after each cook and you reap the benefits. Caramelized buildup won’t wear your grates down or food won’t stick to the cooking surface during your next cookout. Nice.
Keeping the Flame Bright
No matter your type of gas-grill burners, you can use the same cleaning method for them all. But you need some unexpected tools, like compressed air, a bottle brush, and a paperclip (or five paperclips, because you know you’re gonna drop a few).
Start by turning off all the burners, disconnecting the propane tank, if applicable, and removing the burners when they’re completely cooled. You may need to snag your needle-nose pliers and remove the cotter pin that held them in place during shipping. Your good ole gas buddy may also have a screen where the burner is inserted. If so, dust that off while you have access. From here, cleaning your burners is fairly easy—
- Check each burner’s orifice and air shutter for debris, using a bottle brush to clean, if necessary.
- Use a paperclip to unclog the tiny ports that run down the burner.
- If your style of burner has a crossover channel, scrape away any soot with the paperclip (how many clips have you dropped so far?).
- Pump canned or compressed air through the burner opening to force out ash and debris.
- Shake the burner to get any stubborn bits of debris to fall out.
- Wipe away any grime on the exterior of the burner with a grill brush.
How frequently you need to clean your burners depends on the quality of your grill, what you cook, and how often you cook. Besides just looking grimy, your flames will tell you when it’s time to clean your burners. They either get spotty from clogged ports or burn continually orange from too much soot inside the burner. You’ll never regret the time spent cleaning these sources of a good cook when you’re back to working over a steady, reliable fire.
Now Really Get in There
About the time the honeymoon period ends with that new gas grill, it’s time for a deep clean from lid to drip pan. For avid grillers, this means every two to three months. Weekend warriors can likely get away with an annual deep dive at the end of each grilling season.
Now this is the big clean. Everything gets removed, but the drip pan. So wait til your baby’s completely cool and always disconnect the gas line. It’s also a good idea to double-check that all the burners are off just for good measure.
You’re going to move from the top down, so the debris and scraped-off gunk fall into the removable drip pan at the bottom of the grill. This means you don’t start the big clean until your grates are completely clean. If you didn’t burn off leftover grease and grime after your last cookout, then head to the first step in this article and git ‘er done.
Now the grates are glistening (and your beast is completely cool), pull them out and set them aside. This gives you access to the flame tamers. These shield your burners from all the fat, sauces, and marinades that drip down from the cooking surface. Scrub these clean with a stainless steel wire brush. Check the underside too. Heavy exposure to direct flame generally burns off drippings that make their way to the bottom, but it’s worth looking while you’re there.
Once your flame tamers are out of the way, you’re left with the burners and (if your grill includes them) heat baffles. Clean your grill burners one at a time, scraping the exterior with a grill brush and using a paperclip to unclog the gas ports, just like we said earlier in this piece. If you have baffles, give them a good scrubbing as well.
At this point, you have removed every internal component from your grill besides the drip pan. Now’s the time to scrub the bedevil out of the side and firebox walls with a wire brush. This stops corrosion from causing your beloved cooker an early death. Also take a look at the underside of the hood for any carbon buildup and scrub that away.
The temperature probe on the back of the hood thermometer might also be coated with buildup. Grab some Carbon-Off! and a soft cloth or sponge and save the day.
Now is the time to thank your drip pan. At this point, it’s loaded with gunk, debris and residue of your superb cleaning attack. Pull it out from the grill and toss that muck in the trash.
Finally, the best for last — making the old girl shine on the outside. Cleaning away the dust, dirt, and grime from the grill body is as easy as wiping it down with a damp cloth — don’t even think about scrubbing it with an abrasive nylon brush. Unless you want some funky, textured, grunge pattern that will corrode.
With that final swipe of the cloth and its sparkling innards back where they belong, step back and admire your work. Imagine the pure flavors and clean smoke billowing out the next time you fire her up. Did you just hear your grill sigh?
Keep your grill in tip-top shape by following these basic gas grill maintenance steps and keep your grill running smoothly for years to come!