

Baking artisanal bread at home can be both rewarding and practical. With the right tools and techniques, it’s possible to achieve bakery-style loaves with a crisp crust, chewy interior, and rich flavor, all without commercial ovens or specialized equipment.
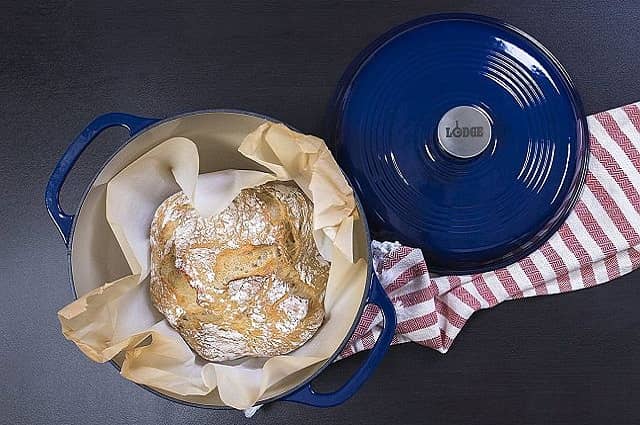
One of the most effective tools for home bread baking is a Dutch oven. The thick, lidded pot creates a sealed, high-moisture environment that mimics professional steam-injected ovens. This setup allows the dough to rise fully before the crust sets, resulting in better oven spring, improved texture, and a more pronounced crust.
Understanding the Basics of Artisanal Bread
Artisanal bread is defined by its simplicity, technique, and quality. The ingredient list is minimal (usually just flour, water, salt, and leavening). However, each element plays a critical role. What sets this bread apart from mass-produced loaves is how the dough is handled and how long it ferments.
Long fermentation allows natural flavors to develop and gluten to form gradually, improving both taste and texture. High-hydration doughs, often used in artisanal styles, also create a more open crumb structure and a chewier bite. Proper fermentation is key to achieving those results, whether you’re using a sourdough starter or commercial yeast.
Understanding hydration ratios, temperature control, and timing is essential. Artisanal bread relies more on technique than additives, which makes precision and observation just as important as the recipe itself.
Ingredients and Tools You’ll Need
The base ingredients for artisanal bread are straightforward. Bread flour is preferred for its higher protein content, which supports gluten development. Water and salt are essential, and instant yeast or a well-maintained sourdough starter can be used for leavening.
A digital kitchen scale is recommended for accuracy, given that small changes in ratios can affect hydration and structure. A large mixing bowl, silicone spatula, and dough scraper help with the mixing and folding process. While not mandatory, a banneton or bowl lined with a floured cloth can help shape the dough and support it during proofing.
Temperature also matters. Water that’s too warm or too cold can change fermentation times. A thermometer or proofing container with clear measurements can help keep conditions consistent throughout the process.
Step-by-Step Process: Mixing, Folding, and Proofing
Begin by combining flour and water and allowing the mixture to rest for 20 to 45 minutes. This helps with gluten development before adding salt and yeast. After incorporating the remaining ingredients, the dough will feel sticky and loose but should become smoother over time.
Instead of kneading, use the stretch-and-fold method during bulk fermentation. Every 30 minutes, gently stretch one side of the dough and fold it over, repeating this on all sides. This builds strength without overworking the dough.
Proofing is complete when the dough has expanded significantly, appears smooth and puffy, and holds a gentle indentation when pressed. Depending on room temperature, this can take four to six hours. Keeping the dough covered and away from drafts ensures an even rise.
Shaping and Preparing for the Oven
Once the dough has completed its bulk fermentation, it’s time to shape. This is where surface tension is created to help the loaf maintain its form during baking. Lightly flour the surface and gently turn out the dough, careful not to deflate it too much. Use the edges of your hands or a bench scraper to tuck and tighten the dough into a round or oval shape.
Let the shaped dough rest for 20 to 30 minutes to relax the gluten. Then, complete a final shaping, seam-side up, and place the dough into a proofing basket or lined bowl. Cover it and refrigerate it for at least eight hours or overnight.
Before baking, allow the dough to sit at room temperature for 30 to 60 minutes while the oven preheats. It should feel firm but springy to the touch.
Baking in the Dutch Oven: Tips for Best Results
Preheat the oven to 475°F with the Dutch oven inside. The pot should be extremely hot before the dough goes in to ensure maximum oven spring. Carefully remove the lid, turn the proofed dough onto parchment paper, and lower it into the pot. Scoring the top with a razor or sharp blade helps control where the bread expands during baking.
Bake the bread with the lid on for the first 20 to 25 minutes. This traps steam and allows the crust to form slowly while the inside continues to rise. After this covered phase, remove the lid and continue baking for another 20 to 25 minutes to develop a deep, even crust.
From Dough to Crust: Your Bread, Your Rules
Mastering artisanal bread takes practice, but the right tools, timing, and care make bakery-quality results possible, right from your own kitchen.
Whether you’re baking artisanal bread for a special occasion or just want better homemade bread, using a Dutch oven elevates the process and results. With consistency and patience, you’ll gain the skills to bake bread that’s not only beautiful but reliably delicious loaf after loaf.